Understanding Internal vs. External Overhaul on the Fireground
Overhaul is one of the most overlooked yet operationally critical phases of firefighting on the fireground. It is often treated as the “cleanup” after the fire is out, but experienced firefighters know better. Overhaul is where fire either stays dead or quietly comes back to life. It is the operating firefighters final opportunity to eliminate hidden fire, confirm extinguishment, and prevent a rekindle that sends crews right back to the same address hours later. For many of us, I am sure we've been in that situation once or twice in our careers.
In modern fire operations, especially in lightweight construction, mixed occupancy buildings, and high heat-release fuel loads, overhaul is not optional. The question is not if we perform overhaul, but how we choose to do it. Whether this is done internally, externally, or a combination of both.
Understanding the difference between internal and external overhaul is essential for safe, efficient, and effective fireground decision-making.
What Overhaul Really Is
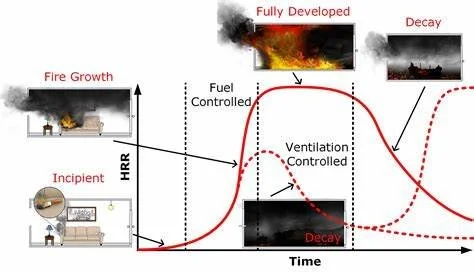
Overhaul is the systematic process of locating and extinguishing hidden fire after the main body of fire has been knocked down. Its purpose is simple, to eliminate hidden fire extension, prevent rekindle, confirm complete extinguishment and reduce future property and life risk.
But in the practical application, overhaul is where fire behavior meets building construction. Fire hides in void spaces, travels vertically and horizontally, and often survives suppression efforts if not aggressively sought out. A main reason why understanding building construction and its relation to fire behavior is a key attribute of a well-rounded firefighter and fire officer. You cannot have one without the other as highlighted in my book, "The 5-Tool Firefighter".
This is not passive work but rather it is controlled destruction with a purpose.
Internal Overhaul: Getting Inside the Problem
Internal overhaul is what most firefighters are familiar with. It involves crews operating inside the structure after knockdown to locate and extinguish remaining fire.
Operationally, this is where firefighters will being opening walls, ceilings, and floors, pulling insulation and debris and checking void spaces and cocklofts. During this time firefighters will use thermal imaging cameras to identify heat signatures looking to expose and extinguish hidden pockets of fire cutting off any extension to other rooms and floors.
Internal overhaul provides direct access to fire travel paths. It allows crews to physically trace the fire’s movement and confirm that no hidden pockets remain.
Advantages of Internal Overhaul
Internal overhaul is precise. When done correctly, it allows firefighters to follow the fire back to its source, ensuring complete extinguishment. It also provides immediate feedback of steam, heat, and visual confirmation guide decision-making in real time.
Risks of Internal Overhaul
With all advantages also comes with its own set of risks. Internal overhaul carries its own hazards:
Structural instability in weakened fire buildings
Heat stress and fatigue after heavy suppression work
Reduced air supply and SCBA endurance during extended operations
Hidden collapse potential in ceilings, floors, and roof assemblies
This phase requires discipline. The fire may be “knocked down,” but the environment is still active and dangerous.
External Overhaul: Working the Problem from the Outside
External overhaul is a more targeted approach that focuses on accessing fire from outside the structure. It is often underutilized, but in certain conditions, it can be the safer and more effective option.
Operationally, firefighters will begin opening exterior siding, soffits, and eaves and exposing roof edges or exterior void spaces. Crews will also be looking to remove exterior finishes to locate fire extension and begin coordinating ventilation with suppression efforts.
Instead of sending crews deep into potentially compromised structures, external overhaul allows firefighters to attack hidden fire from the perimeter.
Advantages of External Overhaul
External overhaul reduces exposure risk. It is especially valuable when the structure is unstable or compromised, interior access is limited or unsafe or fire has clearly extended into exterior void spaces. Another advantage to this type of overhaul is when staffing levels are limited but targeted work is still required. A scenario many fire departments are experiencing in today's world.
External overhaul allows for controlled, strategic removal of building materials without committing crews deep inside the hazard zone.
External overhaul is not a complete substitute for interior work and provides its own set of limitations. It may miss deep-seated interior fire in concealed spaces, provide limited visibility into fire travel paths or require follow-up interior confirmation in many cases. In this case, this type of overhaul works best as part of a coordinated strategy, not a standalone solution.
Choosing the Right Approach: Size-Up Drives Strategy
The decision between internal and external overhaul is not arbitrary. It should be based on continuous risk assessment and fireground intelligence.
Key factors include:
Structural stability and construction type
Location and behavior of fire extension
Time under fire conditions
Available staffing and resource levels
Weather conditions and environmental hazards
Incident objectives and operational tempo
Company officers and incident commanders must reassess conditions after knockdown. The building that was safe during suppression may not be ideal for prolonged interior overhaul. Understanding the impact fire conditions and firefighters working in and on top of the structure are vital areas to look at when determining overhaul tactics after fire suppression.
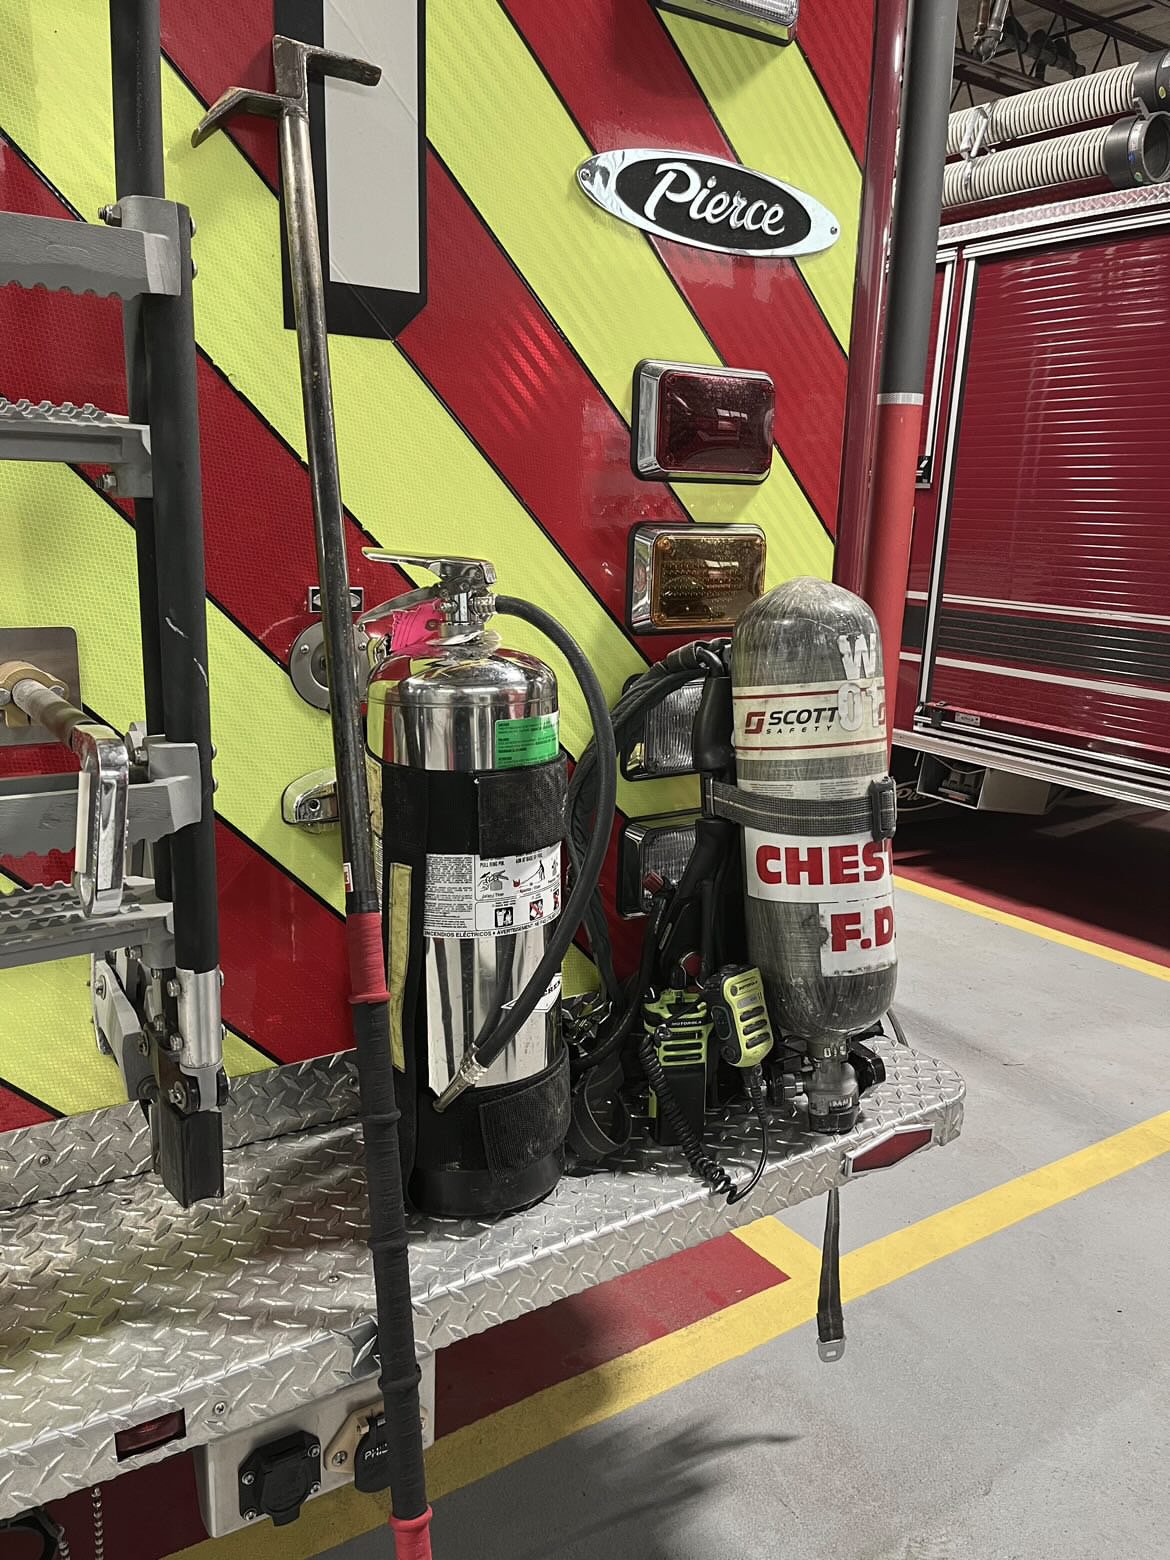
Tools That Drive Effective Overhaul
Modern overhaul is increasingly technology-supported. Key tools include:
Thermal imaging cameras to identify hidden heat signatures
Hand tools such as hooks, pike poles, and axes for controlled opening
Gas meters for monitoring CO and hazardous atmospheres
Scene lighting for visibility in degraded environments
Technology supports decision-making, but it does not replace physical confirmation. Firefighters must still “open it up” when conditions demand it.
Safety: The Overhaul Phase Is Not Low Risk
One of the most dangerous assumptions on the fireground is that risk decreases once the fire is knocked down. In reality, overhaul introduces a different set of hazards:
Air quality degradation from CO and particulates
Fatigue accumulation after peak physical exertion
Structural degradation hidden beneath surfaces
Complacency after visible fire is gone
Accountability, communication, and rehab discipline remain critical. Crews operating in overhaul must maintain the same level of awareness as they did during initial fire attack.
Common Overhaul Failures
Many rekindles and callbacks can be traced back to poor overhaul practices, including superficial inspection of affected areas, overreliance on thermal imaging without physical verification, failing to open concealed void spaces or rushing overhaul to return companies to service. One of the biggest reasons for failures during overhaul isn't our actions but poor coordination between interior and exterior crews. When overhaul is rushed, fire is not extinguished, it is temporarily hidden.
Best Practices for Effective Overhaul
Strong overhaul operations share common traits:
Slow, deliberate, and methodical search patterns
Aggressive confirmation of all potential extension paths
Coordinated internal and external operations when needed
Continuous communication between crews and command
Commitment to “nothing left burning” before clearing the scene
The goal is not speed. The goal is certainty.
Overhaul is not the end of the fire but it is the final control point. It is where discipline replaces urgency, and where attention to detail determines whether the incident is truly over or simply paused.
Internal and external overhaul are not competing tactics. They are complementary tools where smart, well-trained firefighters and departments understand when to go in, when to stay out, and how to combine both approaches to fully eliminate fire from the structure.
Because in the fire service, what you miss in overhaul is exactly what brings you back.
Until next time, work hard, stay safe & live inspired.